GuidesHow to measure a part
How to measure a part to order a 3D printed replacement
A replacement that does not fit is useless, however well it is printed. The problem is almost never the printer but the measurement: a dimension taken with a ruler where a caliper was needed, or the size of the worn part instead of the place it goes. This guide covers what to measure and what to send us, with what we learned on two real jobs.
Updated on September 26, 2026
1. Measure what fits, not everything
A part has many measurements, but only a few decide whether it works: the ones that touch another part. The diameter of the shaft it slides onto, the width of the slot, the distance between the screw holes, the thickness of the wall it rests on. Those are the ones to take carefully; we get the rest from the photos.
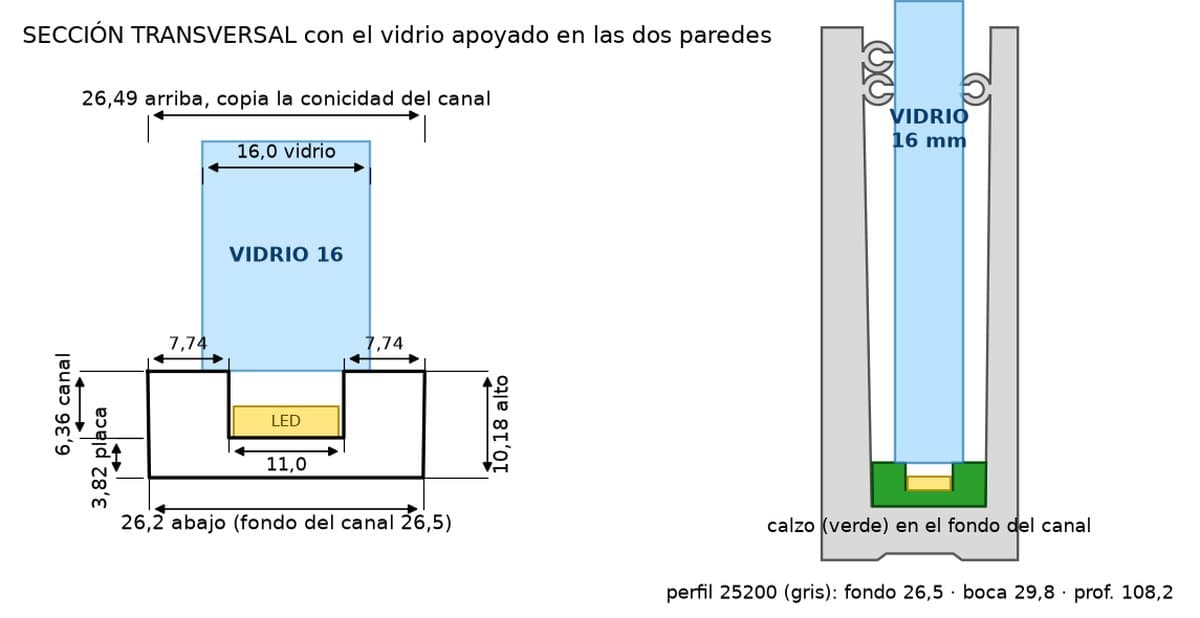
In the setting block we designed for a glass railing, what mattered was the section: it had to fit the bottom of an aluminum profile and hold 16 mm glass. There we promised ±0.2 mm. Along its length ±0.5 mm was enough, because the block comes in segments that fit into each other, with a gap so the plastic can expand in the sun without one segment pushing the next.
If the old part is broken or worn, also measure the place where it goes. A worn part no longer has its original size; the slot it fitted into almost always does.
2. What to measure with
| Tool | How precise | What it is for |
|---|---|---|
| Digital caliper | How precise: Hundredths of a millimeter (reads 0.01 mm) | What it is for: Diameters, thicknesses, slots and holes |
| Ruler or tape measure | How precise: Half a millimeter, at best | What it is for: Lengths and long distances |
| Photo with a ruler beside it | How precise: Does not replace the measurement | What it is for: The shape, the curves and where everything goes |
A simple digital caliper is enough: it measures outside, inside and depth. For a hole, use the inside jaws and measure several times while turning the part; if the numbers differ, the hole is oval, and that is useful to know too. If the part takes a screw, tell us its size (for example, M5) or measure the thread diameter.
3. How to take the photos
- From the front, the side and the top, with the part on a plain background.
- With a ruler or the caliper in the photo, right next to the part and at the same height: if the ruler is closer to the camera than the part, the photo misleads.
- From a little further away with zoom, rather than very close: up close, a phone distorts the edges.
- If it is broken, every piece, plus a photo of the place where it is mounted.
4. What the measurement does not say
Two parts with the same measurements can need different materials. Tell us where it goes (indoors, in the sun, near water), whether it carries weight, whether it bends as it fits and how many you need.
The push-in cap from another job is the best example: it snaps in and flexes as it fits, with 1 mm walls. Printed in the most common plastic it snapped when fitted; in a tougher resin, it did not. Which material suits each use is in the materials guide. And if the part will touch food or get hotter than boiling water, we tell you before quoting: 3D printing is the wrong call there.
5. Tight or loose
You do not need to work out tolerances. Just tell us how it should sit: tight, pressed in so it does not come out, or loose, so it goes in and out by hand. We adjust the model to that and to the material, because each plastic shrinks a little differently as it cools.
What to send us
- The measurements that fit, and what you took them with.
- Three photos with a ruler: front, side and top.
- Where the part goes and what it has to withstand.
- Whether it should be tight or loose, and how many you need.